In modern enterprise networks, manual IP address management is impractical, error-prone, and costly. As environments scale across on-premises, virtualized, and hybrid infrastructures, automated IP address allocation becomes essential.
In this hands-on lab, I set up, deployed, and documented a fully functional DHCP server running on a Windows Server Hyper-V virtual machine, covering everything from scope configuration to high-availability DHCP failover. This lab mirrors how enterprises reliably distribute and manage IP addressing across production networks
What This Lab Covers
This tutorial walks through a full DHCP lifecycle, including:
- Installing and authorizing the DHCP Server role
- Creating and configuring a DHCP scope
- Assigning IP addresses to client virtual machines
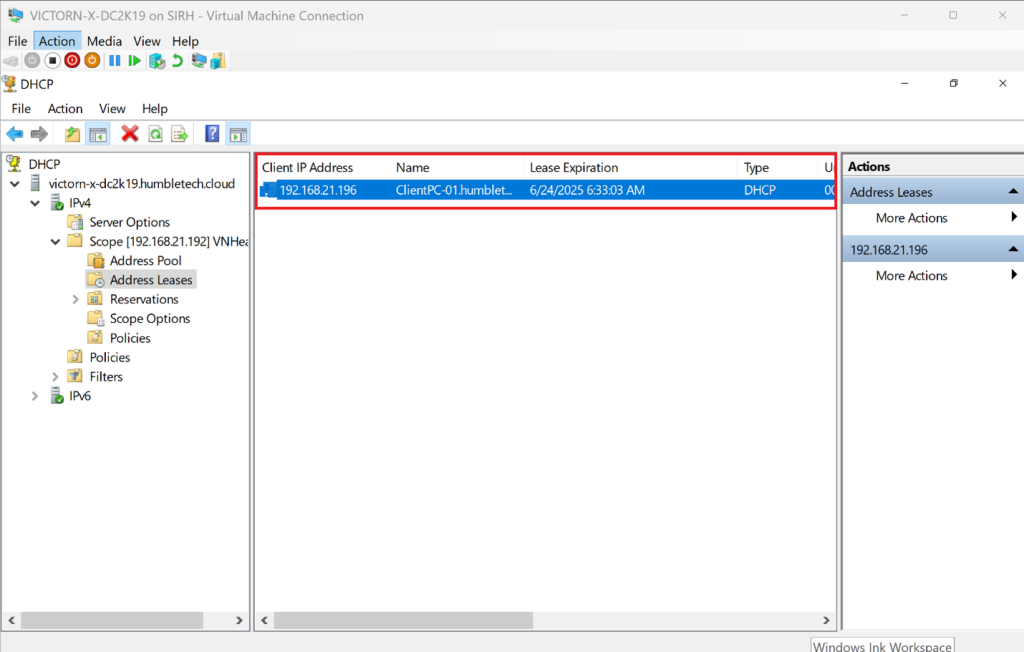
- Validating leases at the client level
- Implementing DHCP Failover (Hot Standby) for high availability
- Verifying scope replication and service continuity
Why DHCP Matters for Organizations
The Dynamic Host Configuration Protocol (DHCP) provides centralized, automated IP address management and eliminates many operational risks associated with static configuration.
DHCP ensures:
- Zero manual IP configuration on clients
- Conflict-free IP address allocation
- Faster device provisioning
- Centralized control for network administrators
- Improved resilience when paired with failover
How DHCP Works: The DORA Process
At a protocol level, DHCP follows the DORA sequence:
- Discover: Client broadcasts a DHCP Discover message
- Offer: Server responds with an available IP address
- Request: Client requests the offered address
- Acknowledge: Server confirms and assigns the lease
Understanding this flow helps with troubleshooting and packet-level analysis.
Lab Environment Overview
- Hyper-V host
- Windows Server 2019 VM (DHCP Server)
- Optional secondary Windows Server VM (Failover partner)
- Windows 10 client VM
**Step-by-Step Implementation **
Part 1: Install and Authorize DHCP Server on Hyper-V
- Start the Windows Server VM in Hyper-V
- Open Server Manager
- Click Add Roles and Features
- Select Role-based or feature-based installation
- Choose your server from the list
- Under Server Roles, select DHCP Server
- Confirm dependencies and click “Add Features.” → Continue the wizard and Click Install
Post-Installation
- Click Complete DHCP Configuration
- Authorize the server (domain credentials required)
- Commit changes and close the wizard
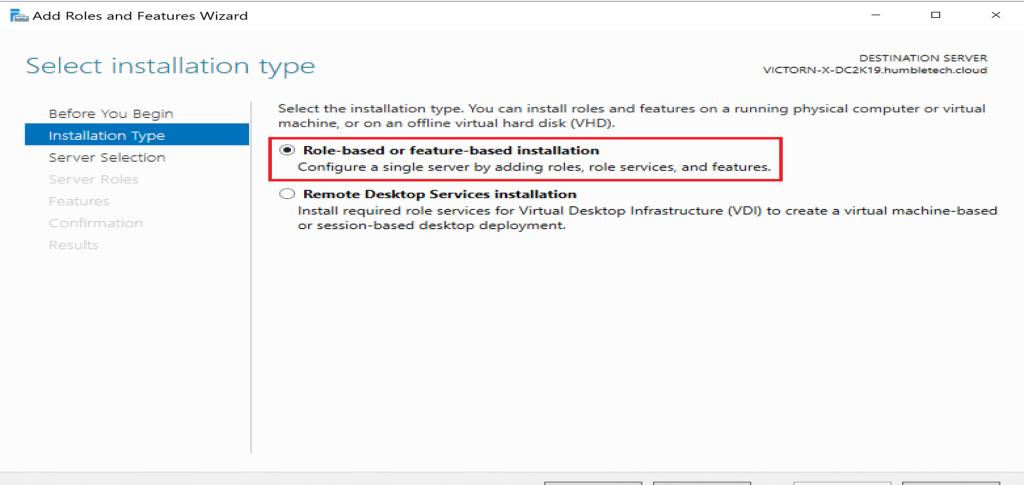
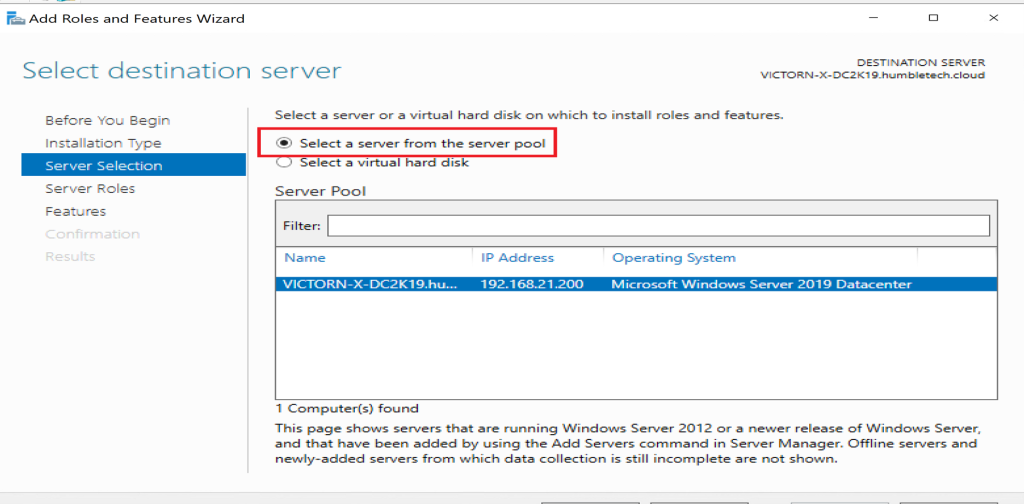
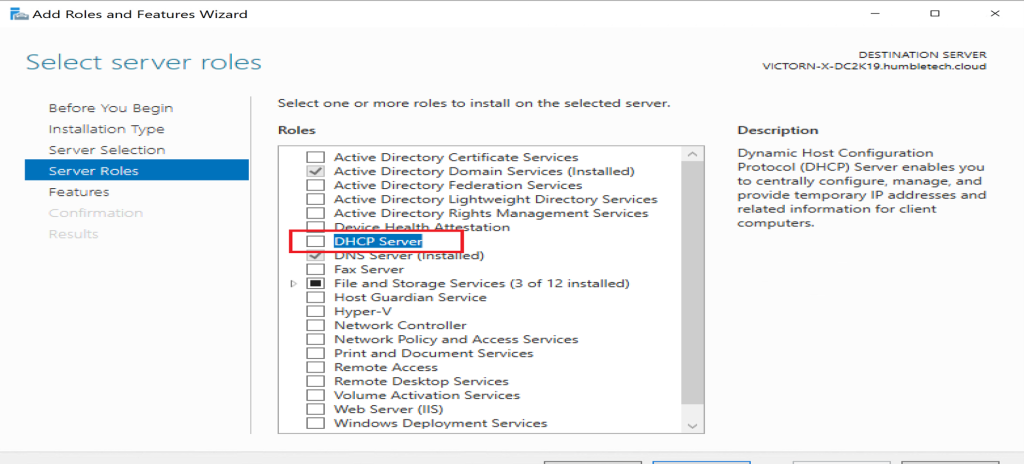
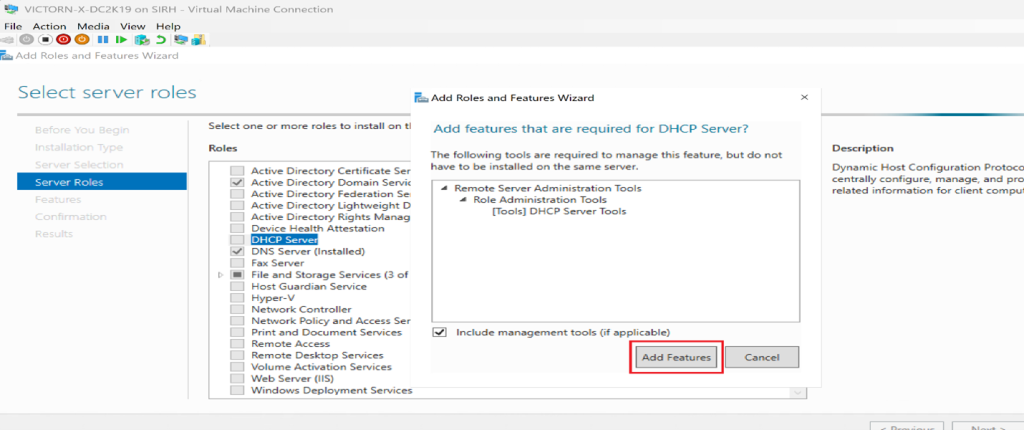
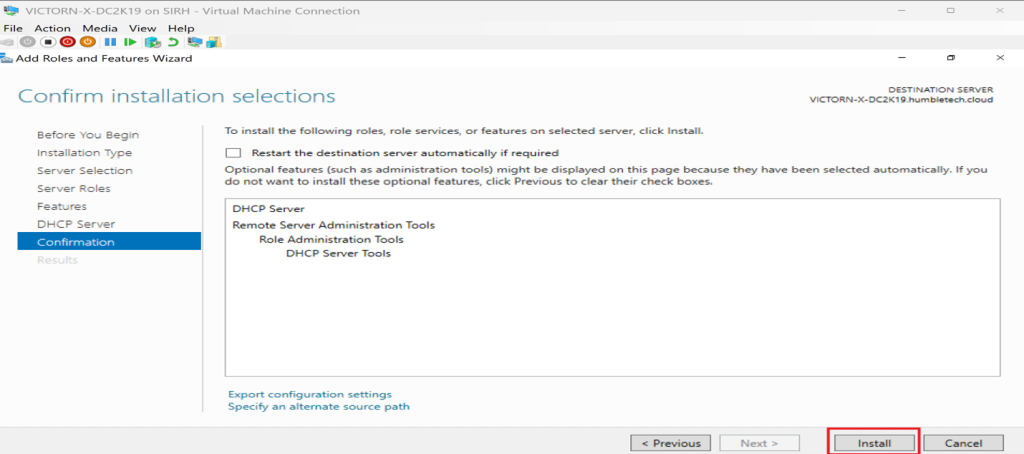
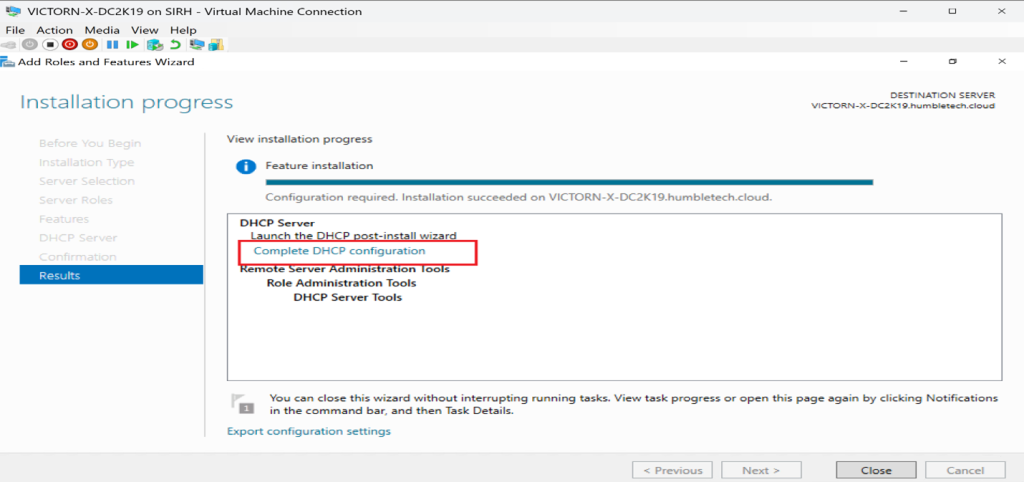
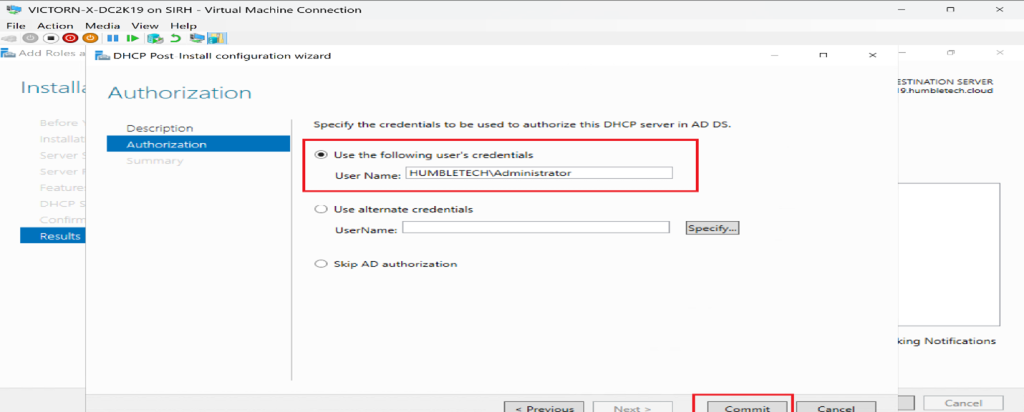
✅ Result: DHCP Server role installed and authorized in Active Directory.
Part 2: Configure DHCP Scope and Address Pool
Create a New Scope
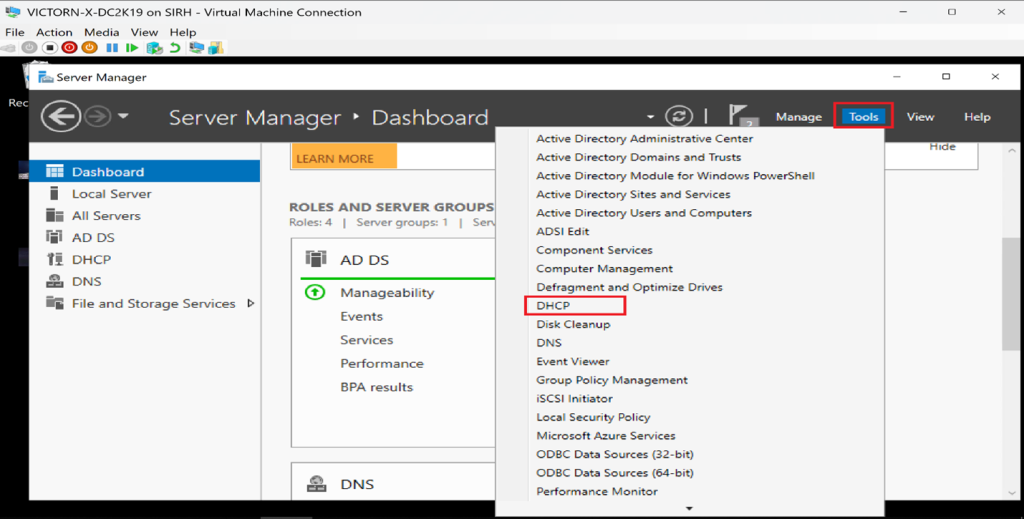
- Open DHCP Manager
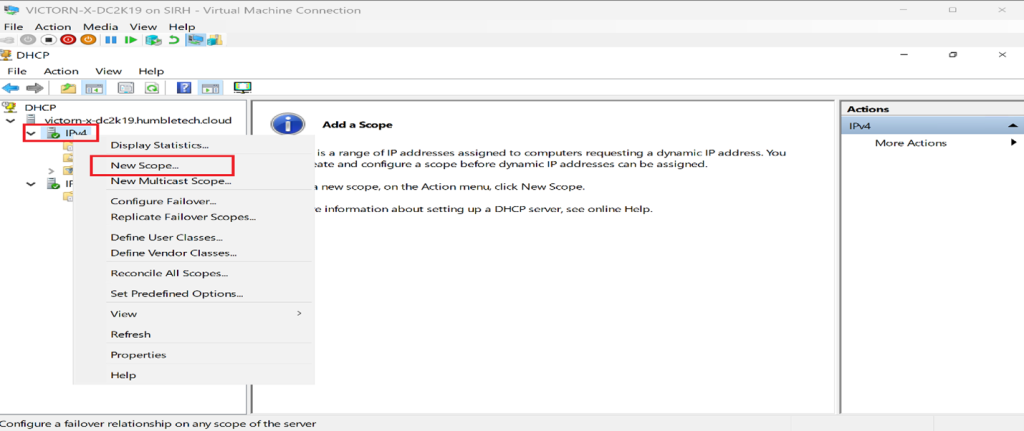
- Expand your server node → Right-click IPv4
- Select **New Scope... **to launch the wizard
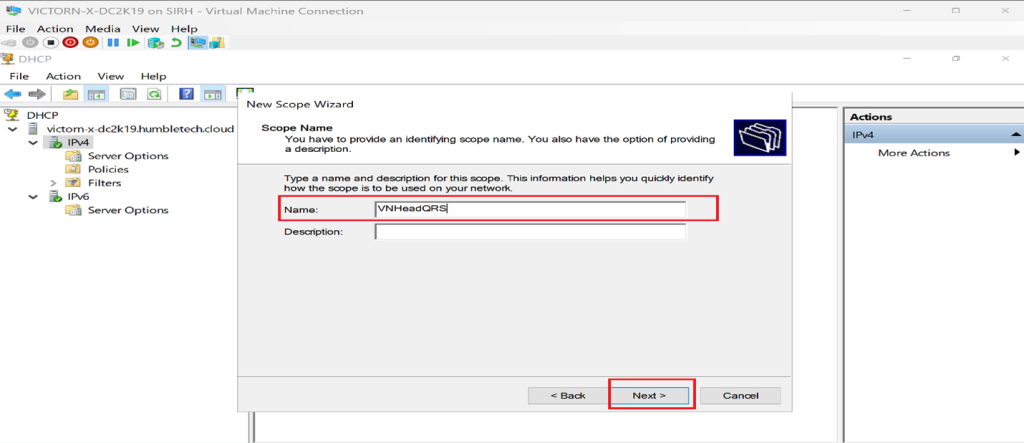
- Provide:
- Scope name (e.g., Lab-Scope)
- Description
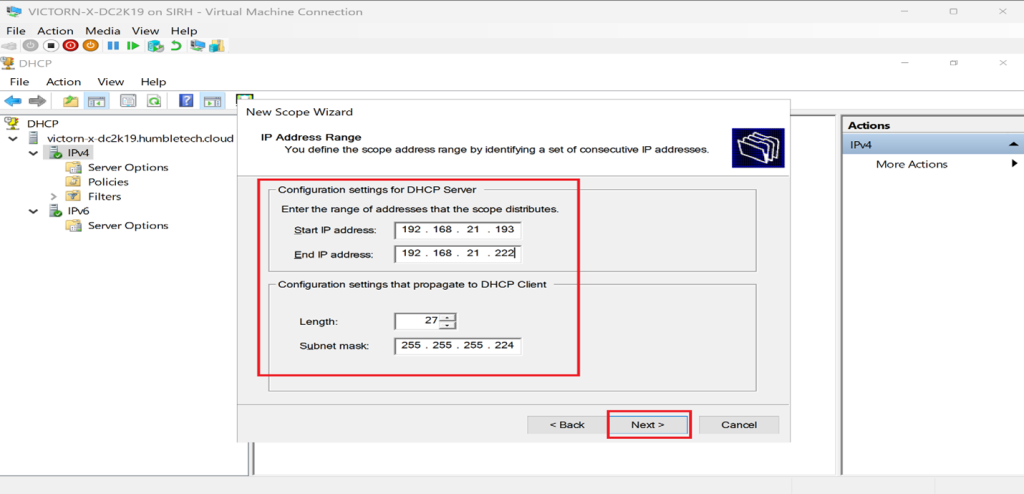
Enter the IP address range, Example.
- Start IP:
192.168.100.10 - End IP:
192.168.100.100 - Subnet Mask:
255.255.255.0
Additional Configuration
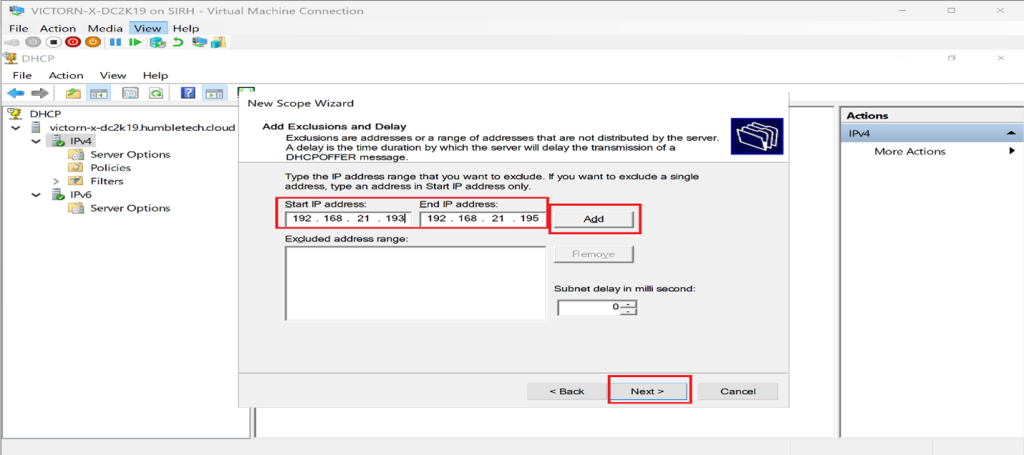
- Exclusions:
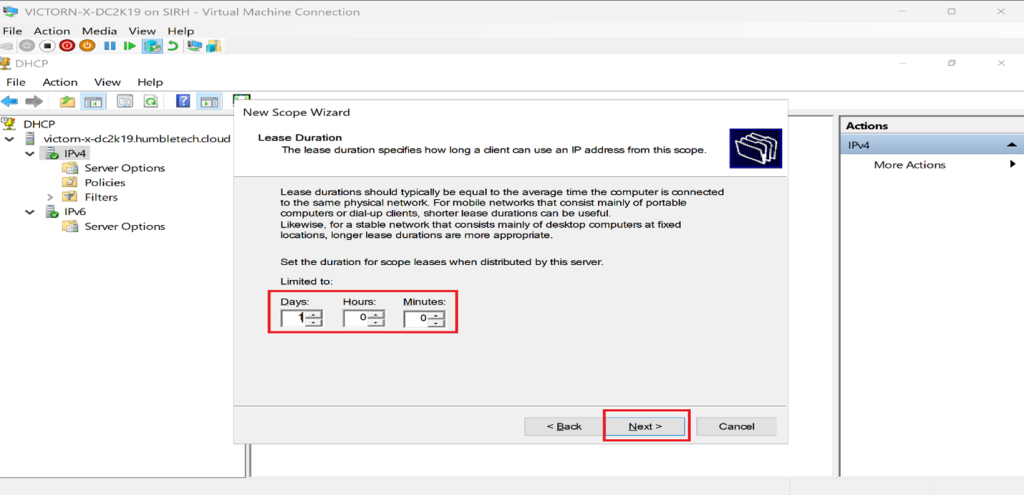
192.168.100.1–9(reserved for static devices) - Lease Duration: 8 days (lab-appropriate)
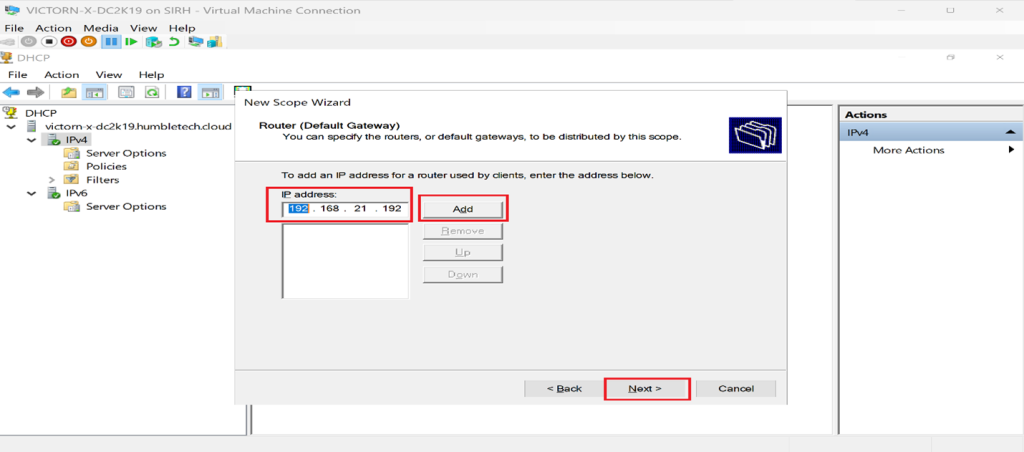
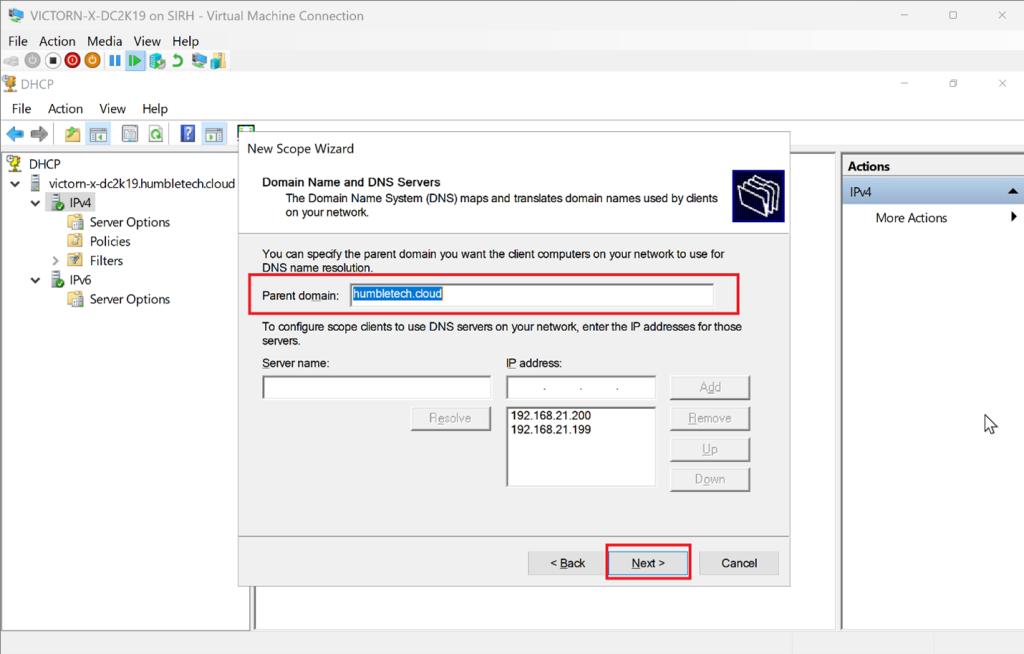
- Options:
- Default Gateway:
192.168.100.1 - DNS Server: Domain Controller or external DNS
- WINS (if applicable)
- Default Gateway:
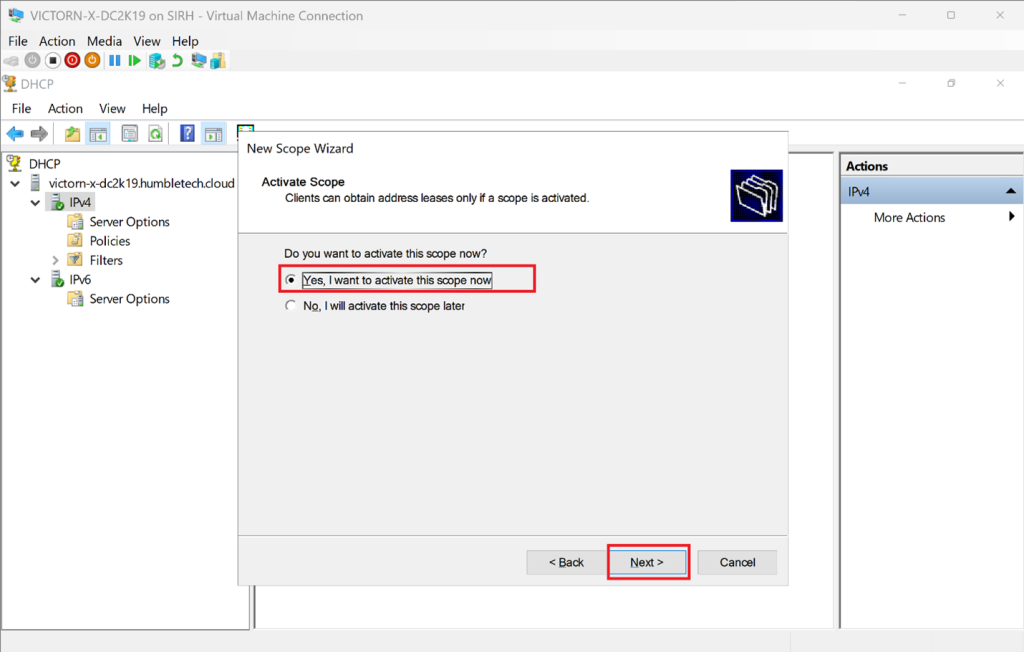
Activate the scope when prompted.
Part 3: Assign DHCP on a Client VM
Windows Client Configuration
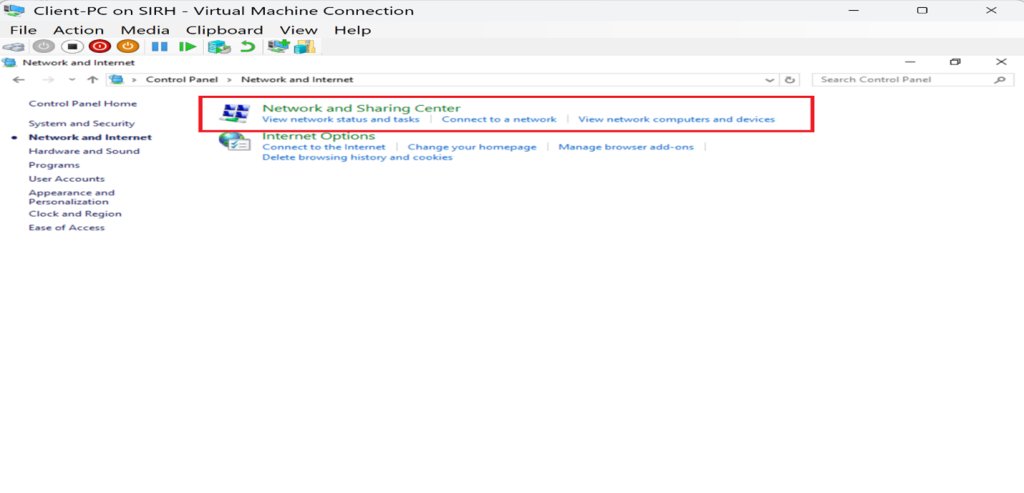
- Open Control Panel → Network and Sharing Center
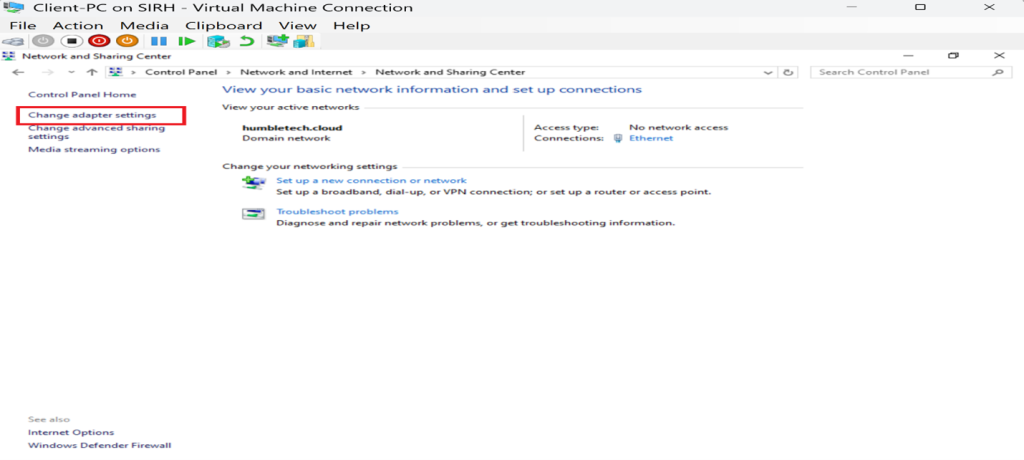
- Click Change adapter settings
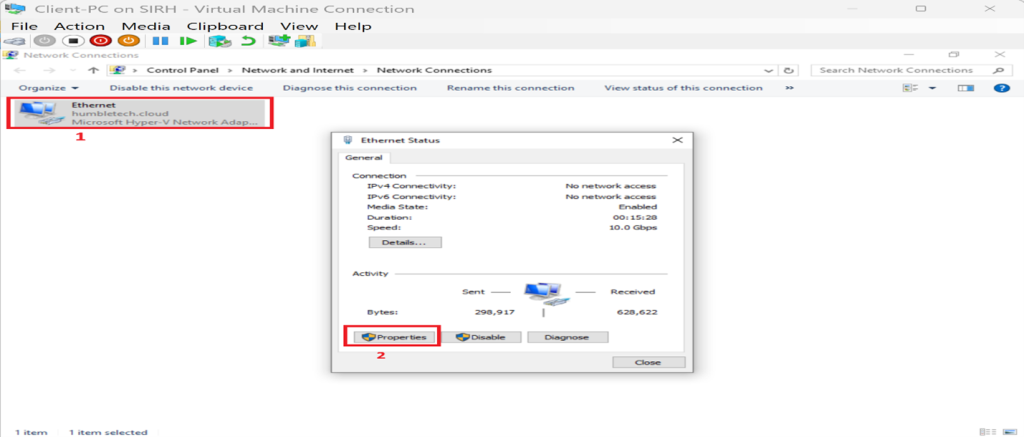
- Right-click the active adapter NIC → Properties
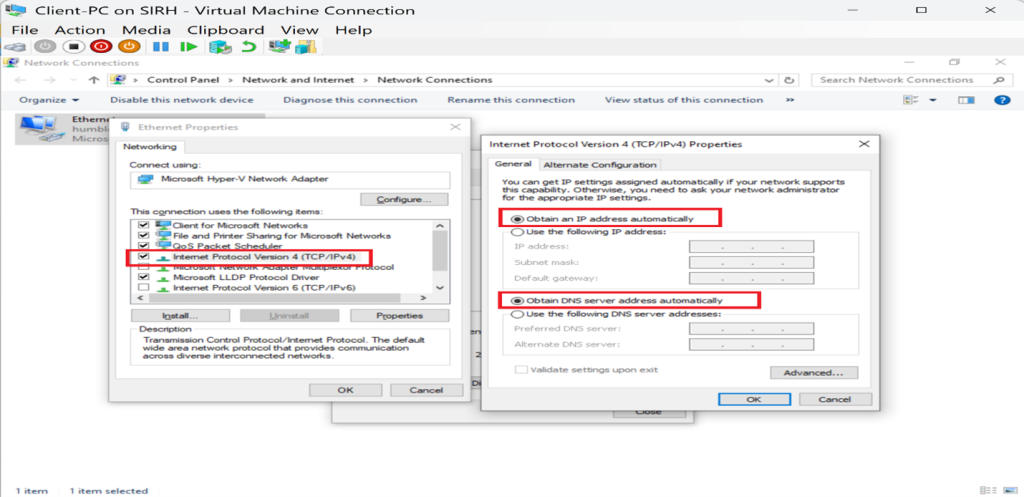
- Select IPv4 → Properties
- Enable:
- Obtain an IP address automatically
- Obtain DNS server address automatically
- Apply and close all dialogs.
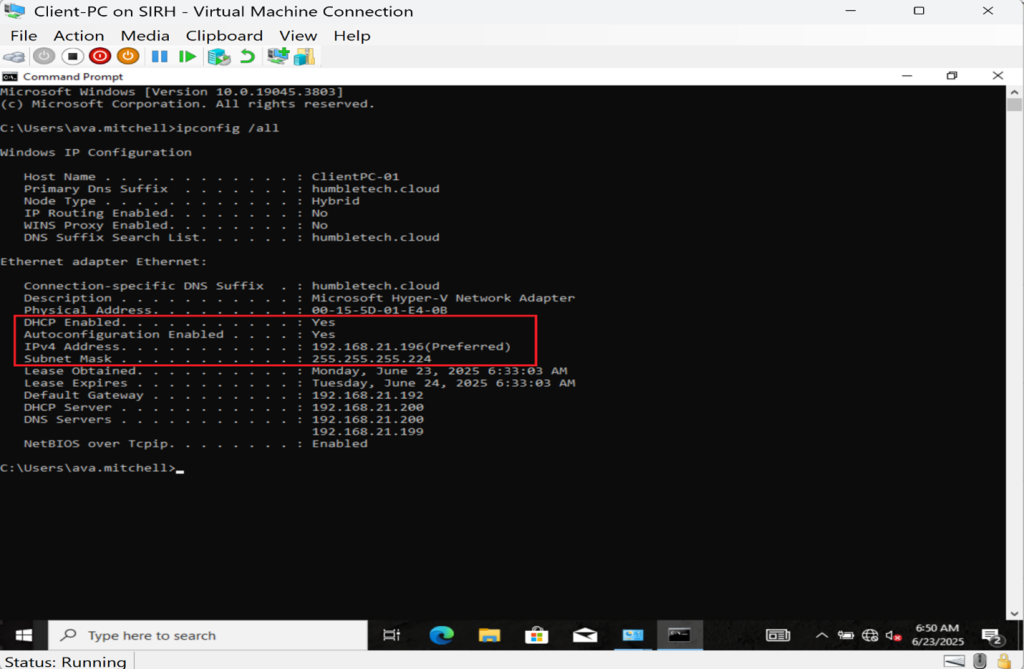
Verification
Run:
ipconfig /all
✅ Confirm the client received an IP from the DHCP scope.
Step-by-Step: DHCP Failover
Part 4: Configure DHCP Failover (High Availability)
To avoid IP address service disruption, DHCP failover is configured between two servers.
Step 1: Prepare Both Servers
- Install and authorize DHCP on both Windows Server VMs
Use Server Manager → Add Roles and Features to install DHCP Open DHCP Console → right-click server → Authorize
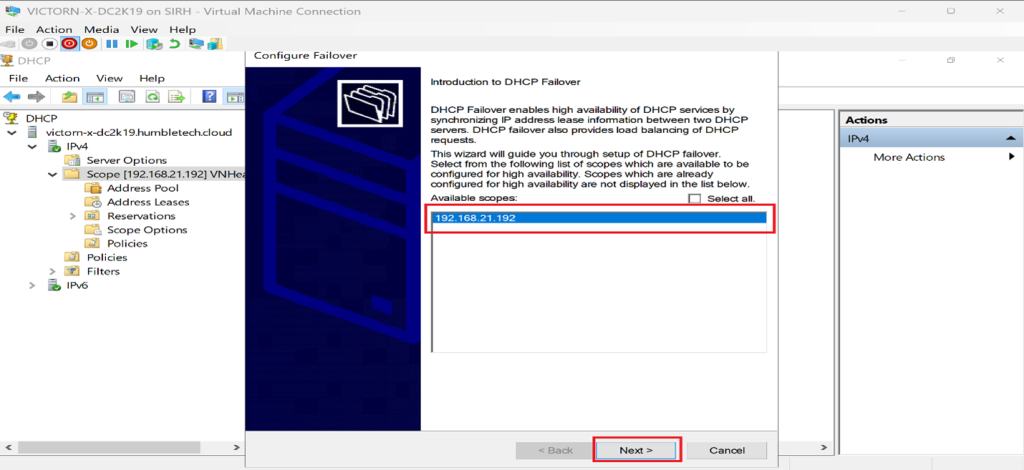
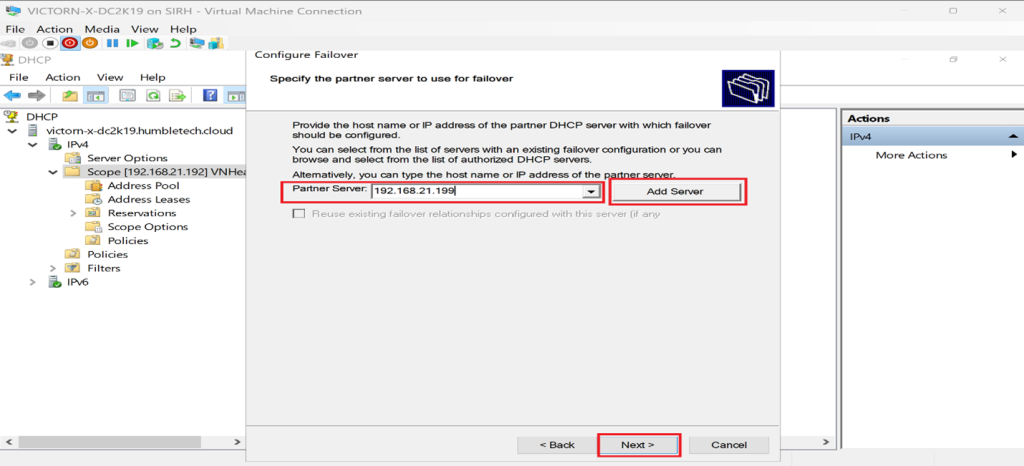
Step 2: Create Failover Relationship
- Open DHCP Manager
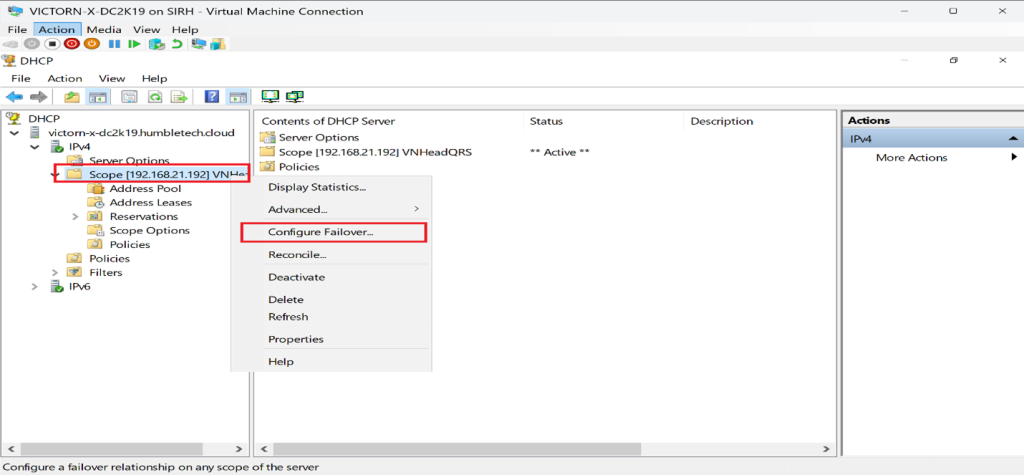
- Right-click the scope → Configure Failover
- Select the scope(s) to share
- Enter the partner server hostname or IP
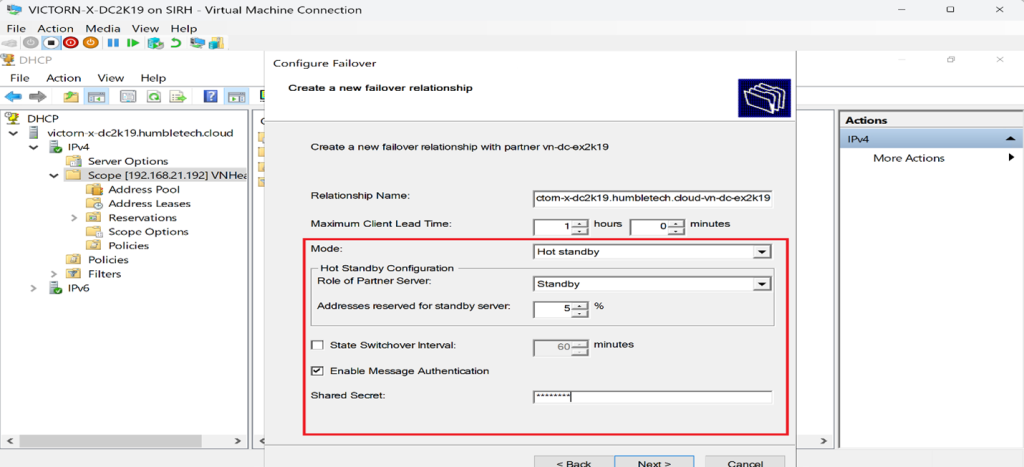
Choose Failover Mode
- Hot Standby - Primary active, secondary passive (Used in this lab)
- **Load Balance **(both servers active)
Configure Settings
- Shared Secret
- MCLT (Maximum Client Lead Time)
- Load balance percentage (if applicable) (default 50/50)
Finish the wizard.
Step 3: Verify Failover Configuration
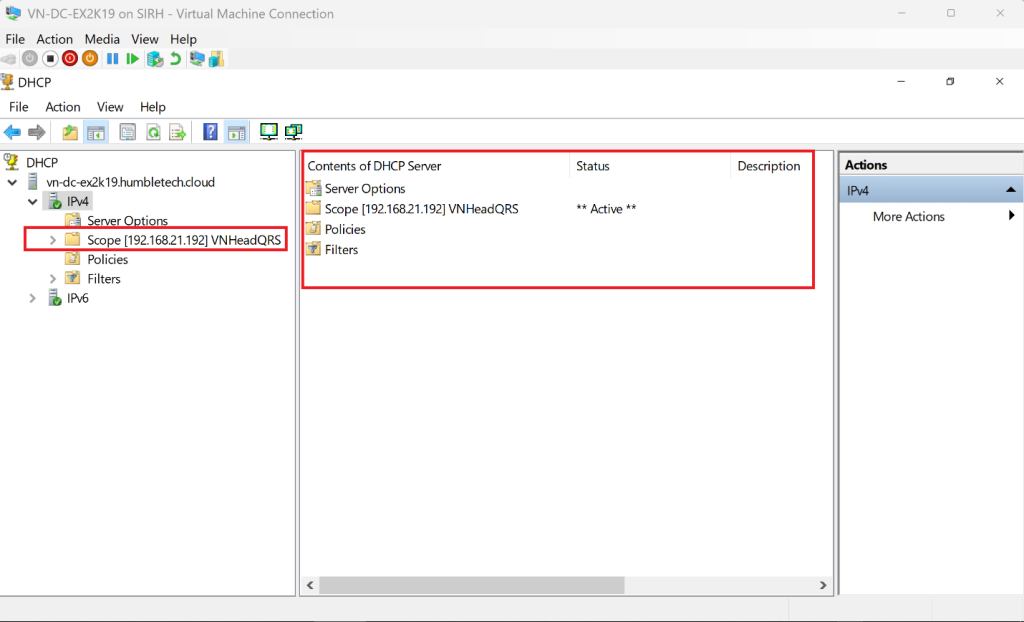
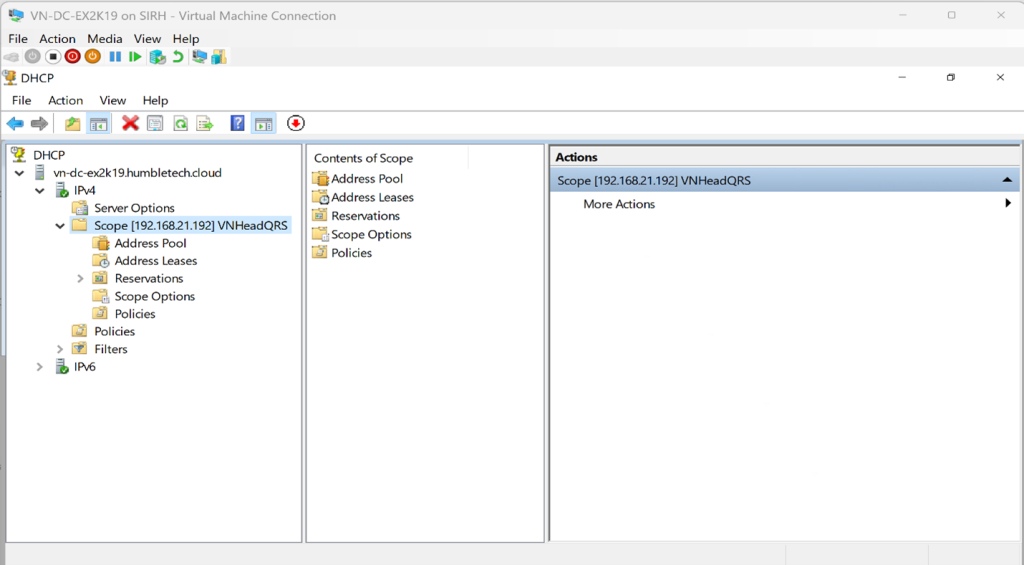
- Expand **IPv4 → Scope **in DHCP Console
- Confirm status shows "Active"
- Ensure scope is replicated on the partner server
✅ Result: High-availability DHCP with automatic failover.
Lab Outcome
- Seamless IP address provisioning
- High availability through DHCP Failover
- Real-time client lease assignment
- Conflict-free IP management
- Enterprise-grade DHCP architecture in a virtualized environment
Key Takeaway
Even in highly automated and cloud-driven infrastructures, DHCP remains a foundational service.
A properly designed DHCP deployment ensures the following:
- Network stability
- Scalability
- Operational resilience
- Faster onboarding of systems and devices
This lab demonstrates how DHCP is deployed **the way enterprises do it: **structured, redundant, and reliable.