Manual infrastructure deployment does not scale in modern cloud environments. It’s not just about speed; it’s about consistency, security, and repeatability. When environments are built through one-off portal clicks, teams eventually hit the same problems:
- Configuration drift: “Dev” and “Prod” stop matching over time.
- Security gaps: controls get applied inconsistently (or forgotten entirely).
- Slow change reviews: you can’t easily code review portal changes.
- Harder governance: tagging, policy enforcement, and access control become unreliable.
Infrastructure as Code (IaC) solves this by making infrastructure declarative, version-controlled, and reproducible. In this lab, we’ll deploy a complete Azure foundation using Bicep inside Visual Studio Code, covering networking, compute, identity & access control, governance, and monitoring all through code.
Tip: Bicep is Microsoft’s recommended IaC language for Azure resource deployments. Bicep compiles to ARM templates behind the scenes, but the authoring experience is cleaner and more maintainable than raw JSON.
🎥 Video Walkthrough
What You’ll Build
This lab deploys a practical baseline environment you can reuse for real projects:
- Resource Group to contain the environment
- Virtual Network (VNet) and Subnets
- Network Security Groups (NSGs) with controlled inbound rules
- Network Interfaces
- Windows and/or Linux Virtual Machine(s)
- Storage Account (example of a managed PaaS resource)
- Monitoring hooks (Log Analytics/Azure Monitor foundations)
- Tagging strategy applied consistently via parameters
- Governance & compliance checks via Azure Policy
- Identity & access control via Microsoft Entra ID roles and least privilege
Architecture Diagram
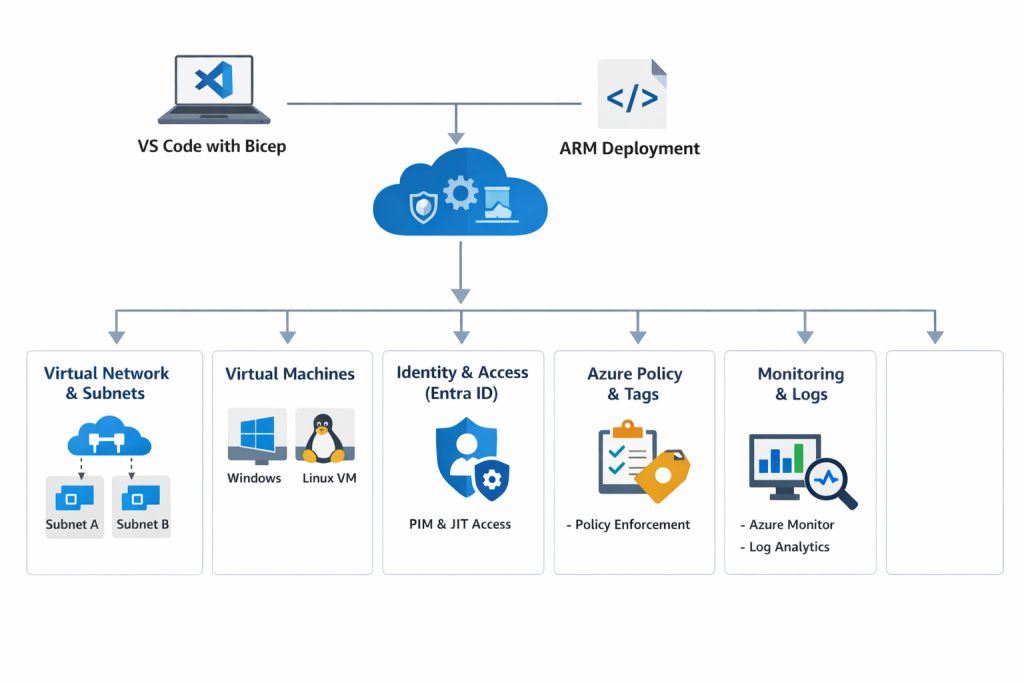
If you want to strengthen your foundation before automating it, link this naturally in your intro section:
Setting Up Clean Azure VNets, Subnets & Tagging
Lab Objectives
By the end of this lab, you will be able to:
- Set up a local Azure IaC development environment
- Deploy Azure infrastructure using Bicep
- Implement identity and access control with Microsoft Entra ID
- Enforce governance with Azure Policy
- Apply consistent tagging across resources
- Validate deployments using the Azure Portal and Azure CLI
- Understand the “enterprise workflow” mindset for repeatable provisioning
Lab Prerequisites
- An Azure subscription
- Azure CLI installed
- Visual Studio Code
- VS Code extensions:
- Azure Account
- Bicep
- ARM Template Viewer (optional, helpful for learning output ARM)
Part 1: Set Up Your IaC Development Environment
1) Install VS Code + Extensions
Install Visual Studio Code and add the extensions listed above. The Bicep extension gives you:
- syntax highlighting
- linting
- autocomplete
- template validation
- quick fixes
2) Authenticate to Azure
Open a terminal and run:
az login
az account show
If you manage multiple subscriptions, explicitly set the right one:
az account set --subscription "<SUBSCRIPTION_ID_OR_NAME>"Part 2: Create the Resource Group
Resource Groups are more than a “folder”; they’re also a lifecycle boundary (deploy, manage, and delete together).
az group create \
--name rg-iac-lab \
--location eastus
Part 3: Write and Deploy Bicep Templates
Recommended folder structure (simple but scalable)
Even for a lab, structure matters. A clean layout makes it easier to expand later:
main.bicep(orchestration entry point)modules/(network, compute, monitoring, storage)parameters/(optional: .json parameter files)
Example:
iac-lab/
  main.bicep
  modules/
    network.bicep
    compute.bicep
    monitoring.bicep
    storage.bicep
  parameters/
    dev.parameters.json
What your Bicep deploys
In your environment, you created Bicep for:
- Virtual Networks & Subnets
- NSGs
- NICs
- Windows & Linux VMs
- Storage Accounts
- Azure Monitor foundations
- Automatic tagging
A practical approach is:
- Put shared values in parameters (location, environment, owner, cost center).
- Pass tags as an object so every module receives the same tagging block
Why this matters: tagging is one of the easiest ways to improve governance, cost tracking, and operational clarity.
To go deeper on governance controls,** Azure Policy, Tags, and Resource Locks Explained: A Complete Governance Guide for Cloud Engineers**
Deploy using:
 az deployment group create \
  --resource-group rg-iac-lab \
  --template-file main.bicep
Part 4: Identity & Access Management (IAM) with Microsoft Entra ID
Infrastructure automation is only “production-ready” when access is controlled correctly. In this lab, you used Microsoft Entra ID to:
- manage users and groups
- enable Privileged Identity Management (PIM)
- use Just-In-Time (JIT) activation for elevated permissions
- verify role activation in the Azure Portal
Why JIT/PIM matters: it reduces standing privilege. Instead of leaving “Contributor” active permanently, it’s activated only when needed, for a limited time.
If you also manage app deployments, check out Azure Web App Zero-Downtime Deployment: A Hands-On Guide to Deployment Slots, Auto Scaling, and Load Testing
Part 5: Governance with Azure Policy (and why it’s a must)
Azure Policy is how organizations enforce standards at scale. Even if your Bicep template includes tags and best practices, policy ensures that:
- resources can’t be created without required tags
- insecure SKUs can be restricted
- regions can be limited
- configurations can be audited continuously
In this lab, your validation included reviewing policy compliance status. That’s exactly the right habit, because the real question isn’t “Did it deploy?” It’s:
“Did it deploy and meet the standards we must enforce every time?”
To deepen your understanding on Azure Policy, check out Azure Policy, Tags, and Resource Locks Explained: A Complete Governance Guide for Cloud Engineers
Part 6: Monitoring and Validation (what to check after deployment)
Once deployment completes, don’t stop at the success message. Validate what matters operationally:
1) Confirm resources exist and are healthy
- Resource Group contains expected resources
- VM provisioning state is “Succeeded”
- NIC attached and IP configuration correct
2) Verify tags are applied consistently
Pick a resource and confirm tags are present and correct. Consistency is the goal.
3) Check policy compliance
Navigate to Azure Policy → Compliance and confirm:
- assignments are in effect
- non-compliant resources are visible
- remediation is possible (where applicable)
4) Confirm identity behavior
If you’re using PIM/JIT:
- activate role
- confirm permissions work only while active
- confirm permissions drop when the activation ends
To level up monitoring as a real skill, check out** How to Set Up Azure Monitor Alerts, Action Groups, and Processing Rules (Step-by-Step Guide)**
Why Bicep (and when it makes the most sense)
Bicep is a strong fit in Azure-first environments because it offers:
- Cleaner syntax than raw ARM JSON
- Faster authoring and iteration (especially with VS Code tooling)
- Native Azure integration (resource types, API versions, docs)
- Modular design (reusable modules for network/compute/storage)
If you’re also building larger, multi-layer environments, your readers may like seeing Bicep used across patterns. Link this in your “Next steps” section:
- Build a Secure Azure Environment in Minutes with Bicep: VMs, Networking, Private Endpoints & Blob Replication
- Deploying a Scalable Azure Environment with Bicep: VMs, NSGs, Subnets & Load Balancer (Step-by-Step Lab)
Key Takeaway
Infrastructure as Code is no longer optional in cloud engineering. It’s how teams build environments that are:
- repeatable across dev/test/prod
- reviewable through version control
- governed with consistent standards
- safer to change over time
This lab demonstrates real-world Azure automation, not just theory, by combining deployment, governance, validation, and identity controls in one workflow.
Recommended Next Labs
To keep learning in a logical sequence, here are the best follow-ups:
- Networking foundation: Azure Networking with PowerShell: VNet Design, Peering, VM Provisioning & Network Watcher (Beginner to Pro)
- Storage hardening: Securing Azure Blob Storage with PowerShell: Network Isolation, SAS Access & Immutable Policies (Beginner to Pro)
- Golden images at scale:** Building Golden Images with Azure Compute Gallery: Custom VM Image Creation & Deployment (Hands-On Lab)**
- Monitoring:** How to Set Up Azure Monitor Alerts, Action Groups, and Processing Rules (Step-by-Step Guide)**
Cleanup
To avoid ongoing cost (especially VMs), remove the resource group when finished:
az group delete --name rg-iac-lab --yes --no-wait